If you don't know what meta tags are, and what is the importance of adding meta tags, here is the detailed description on how to add them to your blogger(blogspot) blogs or any website.
Do you know adding meta tags is so important if you want to get more traffic from search engines like google,yahoo,msn,etc,especially the meta description is the most important one.
If you don't know what meta tags are,Meta tags are the tags which describes your site and tells the search engines what your site is all about.Adding meta tags is an important factor in SEO.(Search Engine Optimisation).Meta tags allows search engines to index your web pages more accurately. In other words,Meta tags communicate with the search engines and tells more information about your site and make it index correctly and accurately.
Here is an example.This is what I got when I typed 'Kranthi tips' in the Google Search Engine.
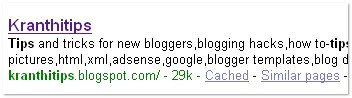
As you can observe.'Tips and tricks............' is the meta tags description which I added to my site.
We have to add two meta tags to the head section of the template.One is the Meta description which describes your site and another one is Meta Keywords which tells about your site keywords(what your site is all about)
Here is how to add meta tags to your blogger(blogspot) blog:
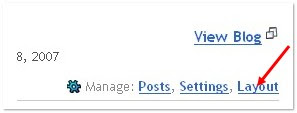
1.Sign in to your blogger dashboard>click the 'layout' button[see the screenshot below]
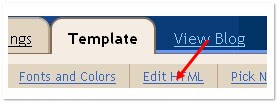
2.Click on the 'Edit html' tab
Here is the code you have to add
<meta content='DESCRIPTION HERE' name='description'/>
<meta content='KEYWORDS HERE' name='keywords'/>
<meta content='AUTHOR NAME HERE' name='author'/>
DESCRIPTION HERE:Write your blog description
KEYWORDS:Write the keywords of your blog
AUTHOR NAME:Write the author's name(Your name)
3.Add the above code just after this [Look at the below screenshot
<b:include data='blog' name='all-head-content'/>

Don't forget to add description and keywords.
and save the changes.
IMPORTANT:
Several people were filling with just the keywords in the description.DON'T DO THAT.Google and other search engines will ban your site from the search engines list if you did so.And also,don't repeat the keyword more than 3 times.
That's it!You have sucessfully added the metatags to your blogger(blogpsot) blog.If you want to check whether you added the meta tags correctly or not,just type 'meta tags analyzer tool' in the google and you will find so many sites which can check whether you have added the tags correctly or not.
ดาวน์โหลดเพลง MP3 ฟังเพลง Vampire listen to music online -
ฟังเพลง ...
ฟังเพลง,
ดาวน์โหลดเพลง, เพลงประกอบละคร,
ฟังเพลงออนไลน์ 24 ชั่วโมง, โหลดเพลง,
MP3 เพลงไทย - เพลงลูกทุ่ง - ดาวมหาลัย
โหลดเพลง, โหลดเพลงฟรี, แจกเพลง ...P เพลงไทย, Ready to Love.
MP3, Vampires เตชินท์, คนที่มาช้าไป.
MP3, คำตอบของหัวใจ.
MP3,
ดาวน์โหลดเพลง, ต้องโทษดาว.
MP3, ...
โหลดเพลง,
ดาวน์โหลดเพลง, โหลด
MP3, แจก
MP3Vampires คลังแห่งการแบ่งปัน
MP3 ไม่มีที่สิ้นสุด.
ดาวน์โหลดเพลง MP3 เพลงไทย ใหม่ๆ และ ริงโทนหาเพื่อนแชท ห้องสนทนา หาเพื่อนชาย หญิง ทอม ดี้ เกย์ หาแฟน คุยออนไลน์ ตลอด 24 ชั่วโมง กับ วัยซ่า ·
ดาวน์โหลดเพลง และ
ฟังเพลงออนไลน์ และ ข่าวเกี่ยวกับนักร้อง ...
โหลดเพลง
ดาวน์โหลดเพลง ...
แจกเพลง โหลดเพลง ดาวน์โหลด เพลง
MP3 ฟรี ...
ดาวน์โหลดเพลง Download
MP3. หนอนผีเสื้อ - หนู มิเตอร์.
MP3 เพลง, แจกเพลง, แจก
MP3, ฟรี
MP3, โหลดเพลง, โหลด
MP3, ดาวน์โหลด เพลง, ...
โหลดเพลง
MP3 โหลดเพลงฟรี
MP3 โหลดเพลงใหม่
ดาวน์โหลดเพลงMP323 ธ.ค. 2006 ... โหลดเพลง
MP3 ผมไม่อัพให้ใหม่ แล้วครับ ขอให้ โหลดเพลง
MP3 จาก google ให้สนุกนะครับ ...
ดาวน์โหลดเพลง MP3 Music ดาวโหลดเพลง
MP3 ออดิชั่น ...
ดาวน์โหลดเพลง ดาวน์โหลด ซื้อเพลง เพลง
ฟังเพลง เพลง เพลงออนไลน์ ...
ดาวน์โหลดเพลง ดาวน์โหลด ซื้อเพลง ทั้งเพลงไทย เพลงสากล เพลงลูกทุ่ง จากค่ายเพลงต่างๆได้ที่นี่ทั้ง gmm, rs, Warner,Indy และอื่นๆอีกมากมาย.
ดาวน์โหลดเพลง โหลดเพลงฟรี ขอเพลง แจกเพลง Download
MP3 Free
MP3 ...
ดาวน์โหลดเพลง โหลงเพลงฟรี แจกเพลง ขอเพลง Free
MP3 Download
MP3 เพลงไทยเพราะๆ เพลงเก่า เพลงสากล เพลงฮิต เพลงใต้ดิน เพลงอินดี้ เพลงเพื่อชีวิต เพลงลูกทุ่ง ...
DOWNLOAD เพลง MIDIDOWNLOAD เพลง MIDI. หากคุณต้องการขอเพลง MIDI จากทางเรา คลิ๊กที่นี่ครับ ... 5, เพลง OK นะคะ, แคทลียา อิงลิช, 9 K, คลิ๊กที่นี่, DOWNLOAD ...
Download
MP3 and Download .
MP3 Music Lyric : ฟรี โหลดเพลง
MP3 ...Download
MP3 โหลดเพลง ฟรีได้ที่นี่ เวปไซต์สำหรับ โหลดเพลง
ฟังเพลง โหลด
MP3 Download .
MP3 ดาวน์โหลดเพลง Download
MP3 Free.
เพลงฟรี
MP3 ฟรี โหลดเพลง
MP3 ดาวน์โหลดเพลงฟรี โหลด
MP3 เพลงออนไลน์ ...เพลงฟรี
MP3 ฟรี โหลดเพลง
MP3 ดาวน์โหลดเพลงฟรี โหลด
MP3 เพลงออนไลน์
ฟังเพลง เพลงสากล เพลงสตริง ... ไม่รู้ชื่อเพลง แต่สนุกดี ...
เพลง
ฟังเพลง MV
ฟังเพลงออนไลน์ โค้ดเพลง
ดาวน์โหลดเพลง, โค้ด Hi5 ...
ฟังเพลง MV
ฟังเพลงออนไลน์ โค้ดเพลง
ดาวน์โหลดเพลง, free music,
MP3 music,
MP3 download, free video, เพลงเพื่อชีวิต, เพลงลูกทุ่ง, เนื้อเพลง ...
เพลง,ริงโทน,โหลดเพลง,คาราโอเกะ,ดาวน์โหลด,มือถือ ธีม ...เพลง,โหลดริงโทน,เพลงใหม่,
ดาวน์โหลดเพลง,โหลดเพลง ,เสียงเรียกเข้า,คาราโอเกะบนมือถือ,มือถือ,ริงโทน,ข่าว,การเมือง,ดารา,ผลบอล,สมัคร,ระเบิด,นักเรียนตบกัน,ข่าว ...
ฟังเพลง,
ฟังเพลงออนไลน์,
ฟังเพลงเกาหลี,
ฟังเพลงญี่ปุ่น ...เพลง,
ฟังเพลง, โหลดเพลง,
ดาวน์โหลดเพลง,
MP3, mv, เพลงใหม่, เพลงฮิต, โค๊ดเพลง, Vampires, ... โหลดเพลง
MP3 Vampires 677 Power Record . ...
ดาวน์โหลดเพลงMP3 ดาวน์โหลดเพลง ดาวน์โหลดเพลงฟรี
ฟังเพลงฟังเพลงออนไลน์
ดาวน์โหลดเพลง. ...
ดาวน์โหลดเพลงMP3 ดาวน์โหลดเพลง ดาวน์โหลดเพลงฟรี
ฟังเพลง ·
ดาวน์โหลดเพลงMP3โหลดเพลง , download เพลง ฟรี ,
ดาวน์โหลดเพลง , โหลดเพลงฟรี - โหลด ...โหลดเพลงฟรี - โหลดเพลง
MP3 - download เพลง. โหลด
MP3 ฟรี - เพลง
MP3 ใหม่. ฉันดีใจที่มีเธอ · ไม่ยอมตัดใจ (mai yom tad jai) - เสก โลโซ LOSO ...
ดาวน์โหลด เพลง เพลงละคร เพลงประกอบละคร ละคร ทีวี เรื่องย่อ เรื่อง ...ดาวน์โหลด เพลง เพลงละคร เพลงประกอบละคร ละคร ทีวี เรื่องย่อ เรื่องย่อละคร เพลงประกอบภาพยนตร์ ละครเกาหลี ซีรี่ย์เกาหลี เรื่องย่อละคร ลีซาน ...
ดาวน์โหลดซิค่ะ -
ดาวน์โหลดเพลงที่นี่ ที่เดียวอยู่25 มิ.ย. 2009 ... ดาวโหลดเพลง
MP3 เอ็มพีสาม ที่นี่ รวมทุกอย่างไว้รอคุณแล้ว.
ดาวน์โหลดเพลง


